Latest Blog Entries by Alexander Treadwell
-
Flames and Bubbles
Tutorial: Making KSP Engine FX in Unity 3d 15 June 2018
Introduction:
Many of us modders, including myself. like to have custom effects for our engines instead of using the the ones included in the game. Unfortunenly there isn't much documentation on how to make custom plumes. Here I describe, in a brief tutorial (with pictures!), how to make your own engine plume effects for Kerbal Space Program.
What you will need:
1. A model of an engine.
2. A copy of Unity 3d.
3. A *.png graphic with an alpha channel for use as the particle effect.
4. A copy of KSP PartTools
5. A text editor (preferably Notepad++) to edit the config for your engine.
Step 1:
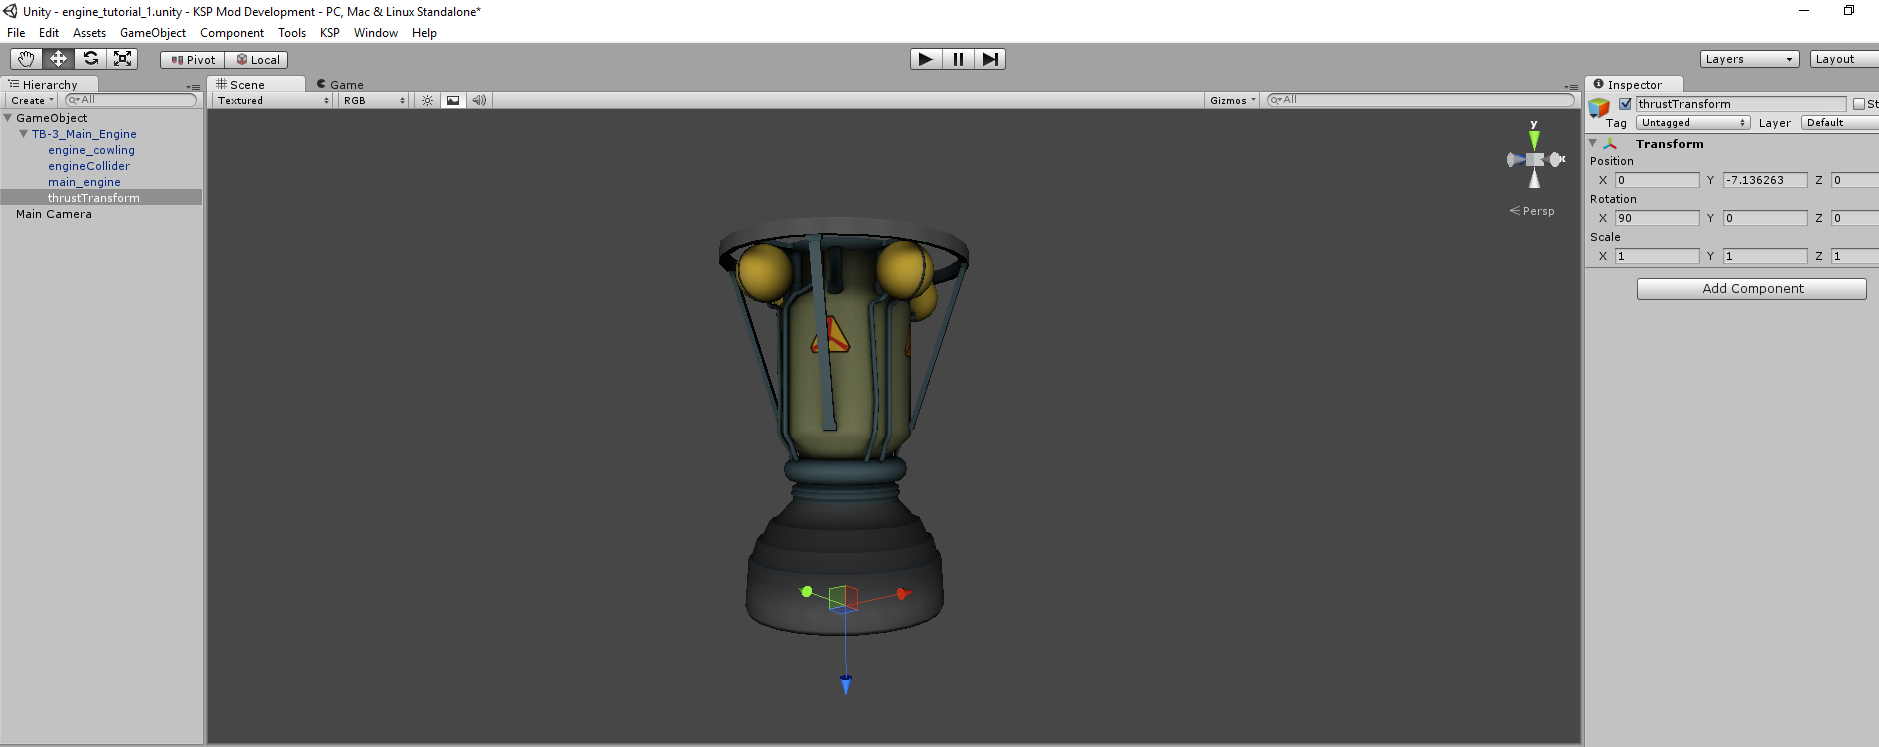
Set up your engine model in unity as usual with the thrust transform Z+ axis pointing in the direction you want the trust to go.
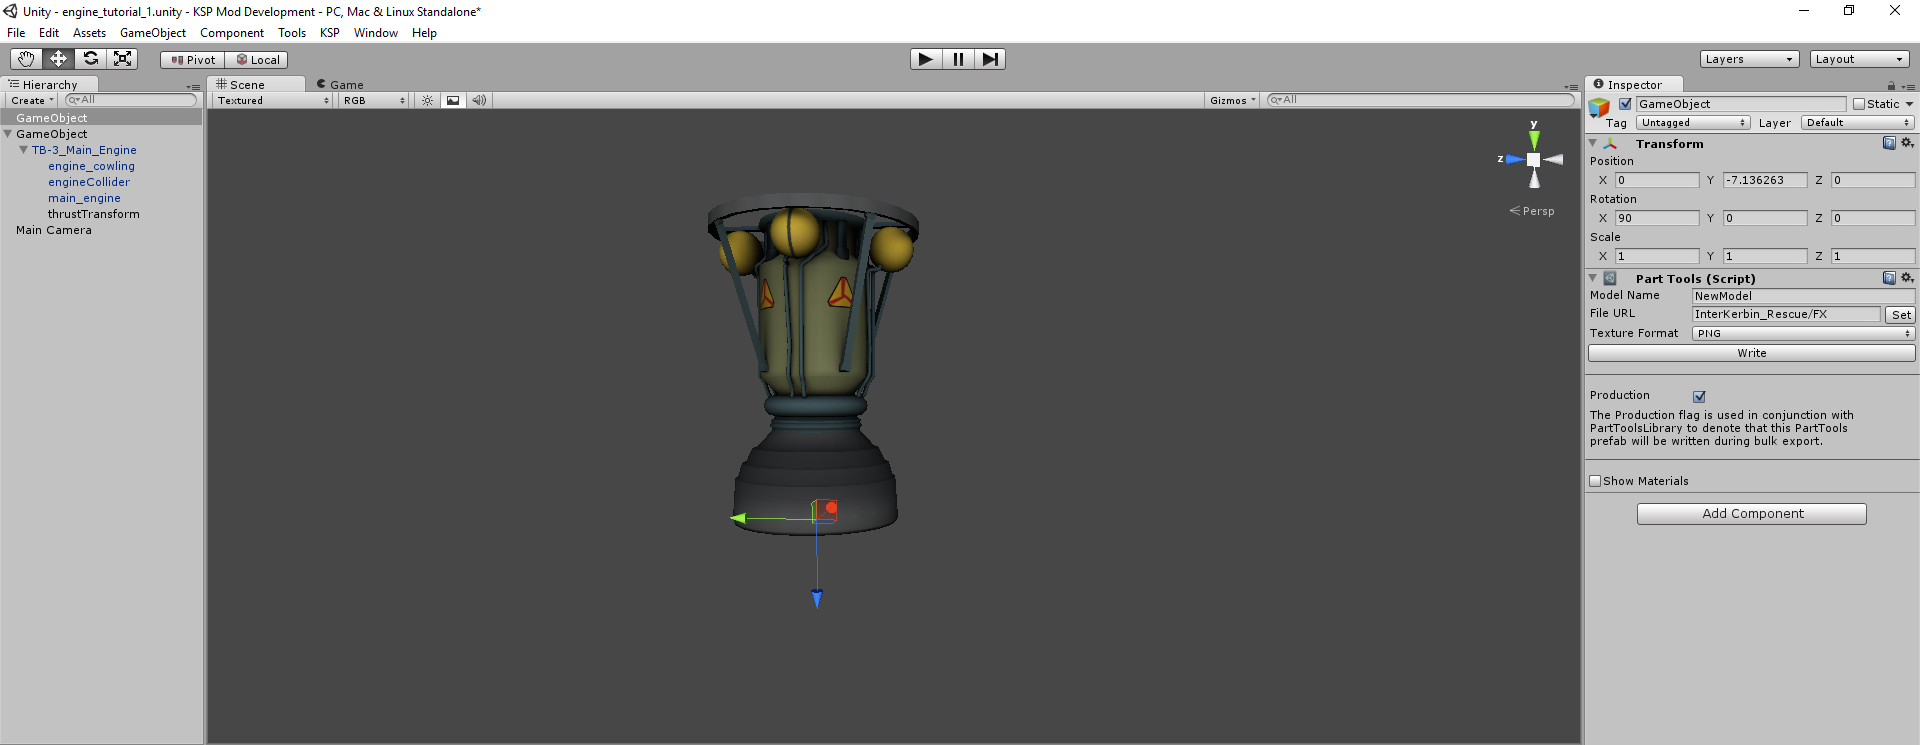
Step 2:
Make a new empty GameObject with KSP part tools at the location of the thrust transform. This will be the new (0,0,0 x,y,z) parent origin for the particle effect. Make sure that the new empty object is facing in the exact same orientation as the thrust transform with Z+ pointing in the desired direction of thrust.
Step 3:
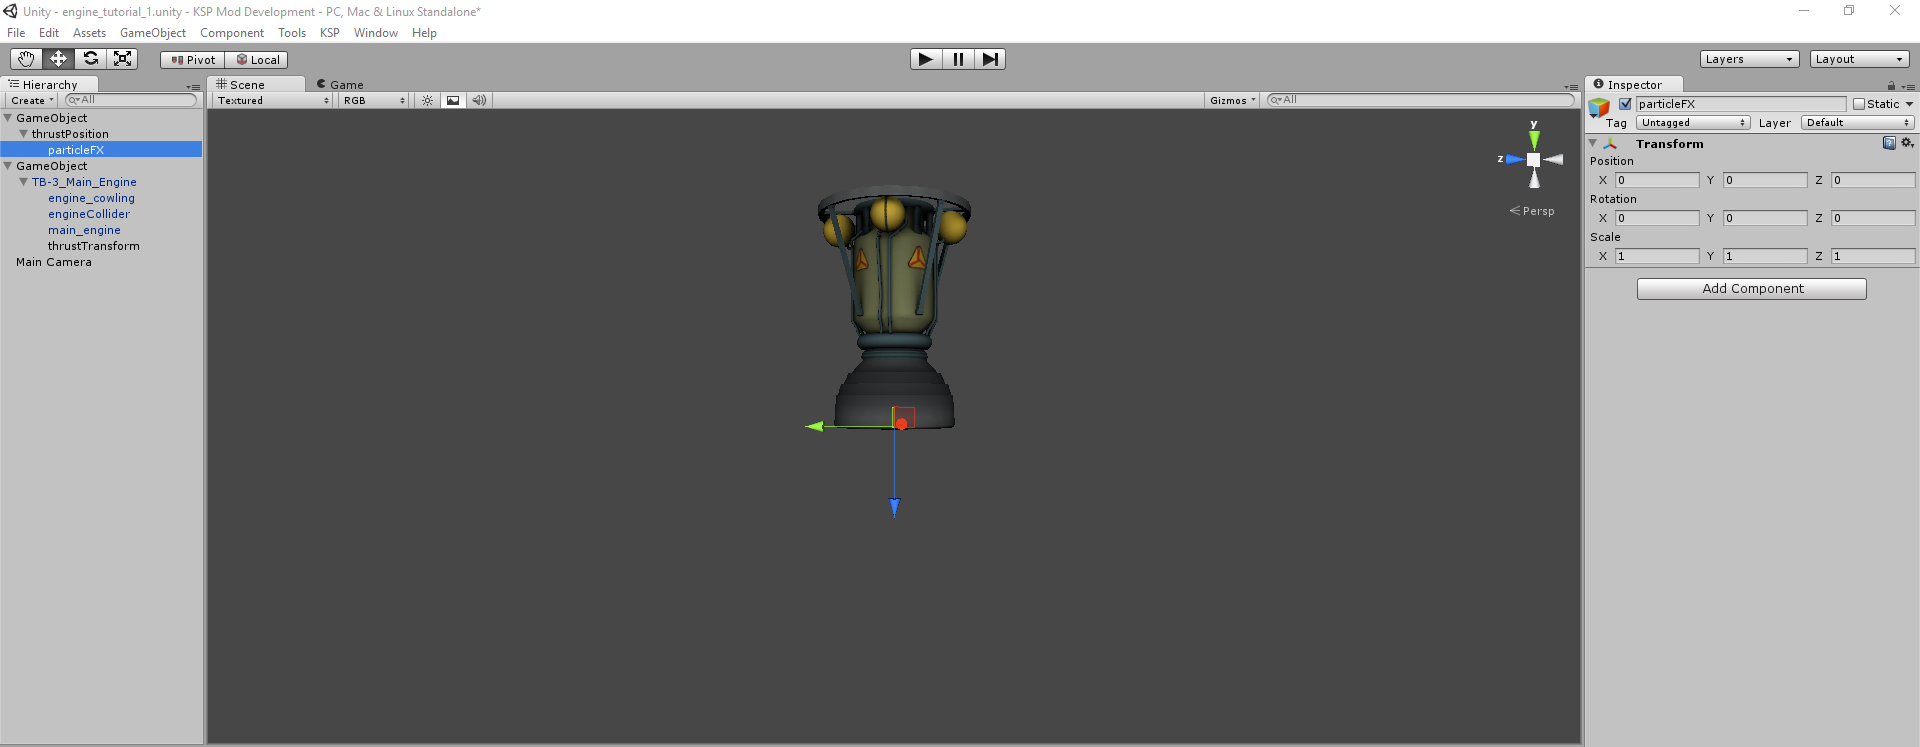
Make a second empty GameObject and make it a child to the parent and give it a name. Here, I called it 'thrustPosition'. The reason for this transform is so you can reposition the particle effect transform if desired.
Step 4:
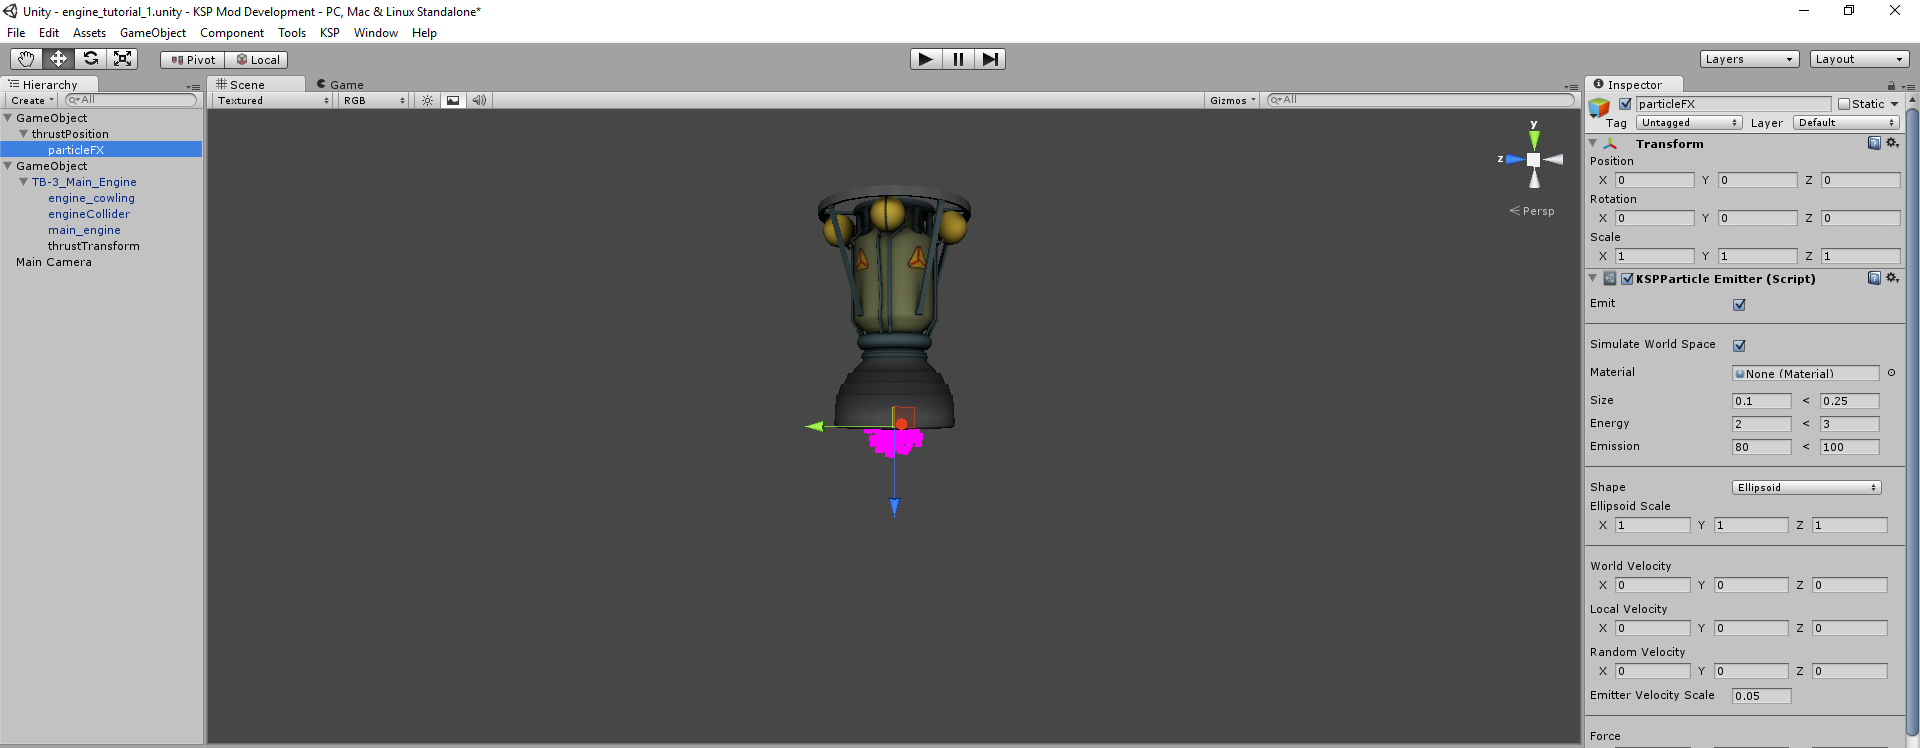
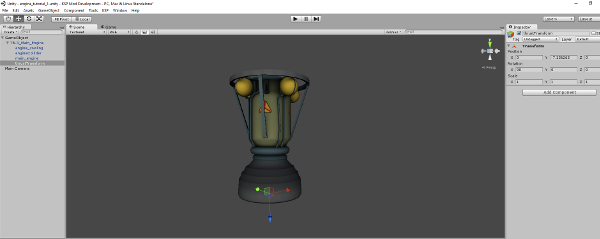
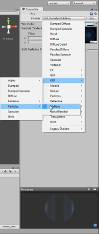
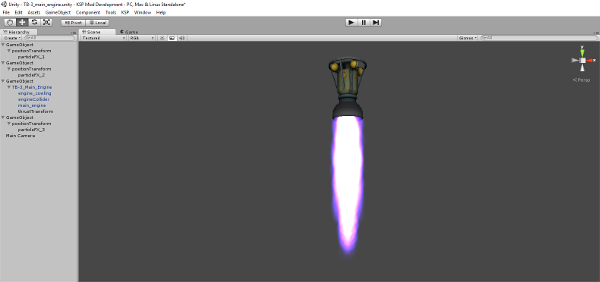
Add third GameObject and make a child to the empty transform above and give it a name. Here, I called it 'particleFX'. Be sure that the Z+ of the transform is following the same orientation as the previous transforms.
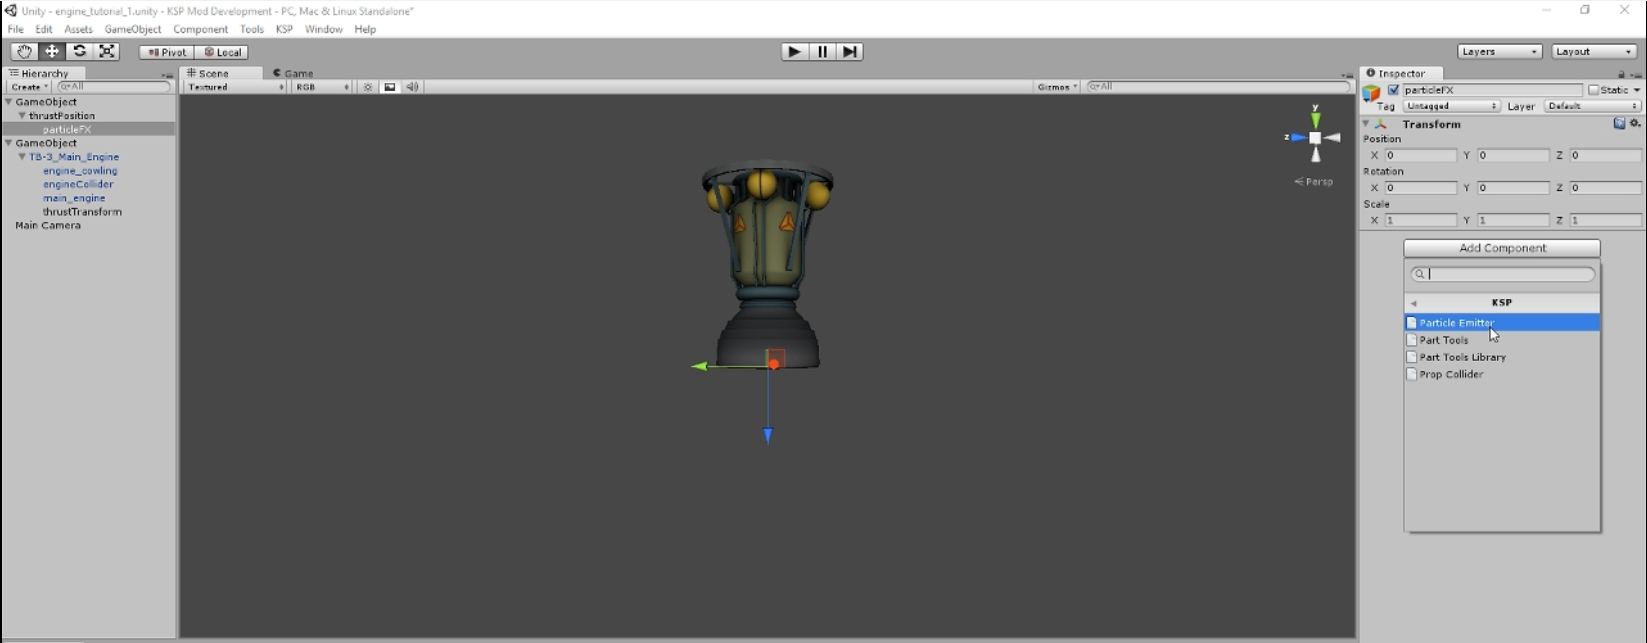
Next add a 'KSP Particle Emitter' to the 'particleFX' object.


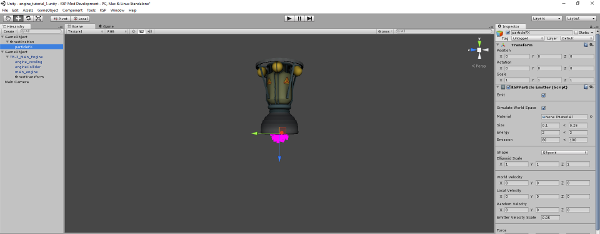
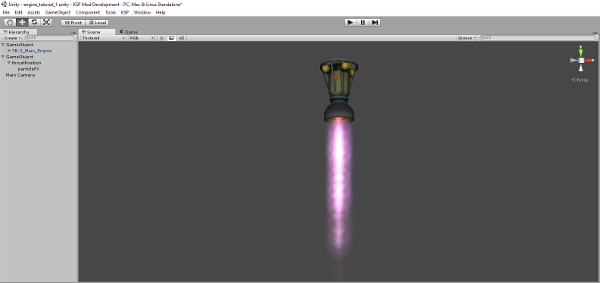
You now have your engine FX set up. You should have something that looks similar to the image below.
Step 5:
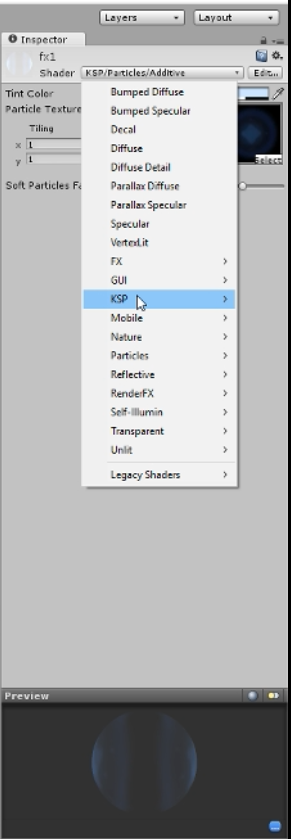
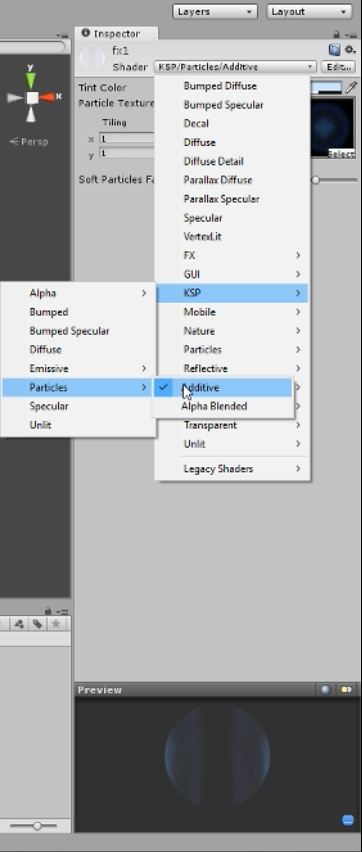
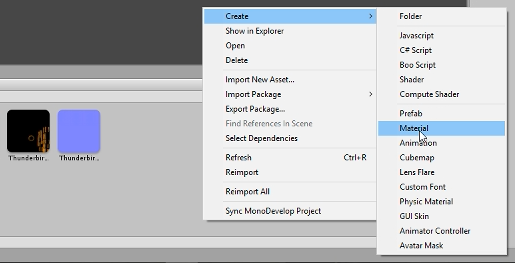
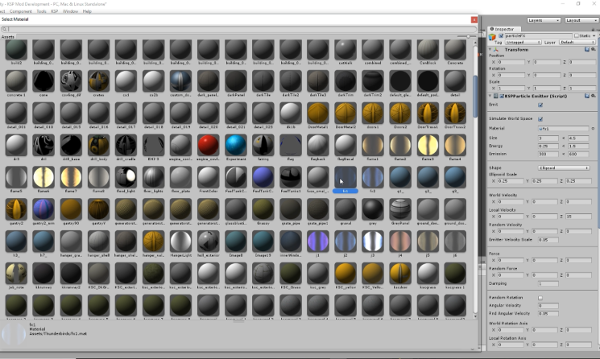
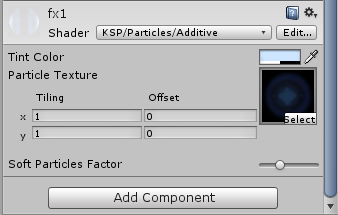
Now create a new material by right clicking the project bay (the window where all your textures and models are displayed) and selecting 'new material'. Add your particle texture by dragging the texture to the selected new material in the inspector. Set the material as 'KSP/Particles/Additive'.


Step 6:
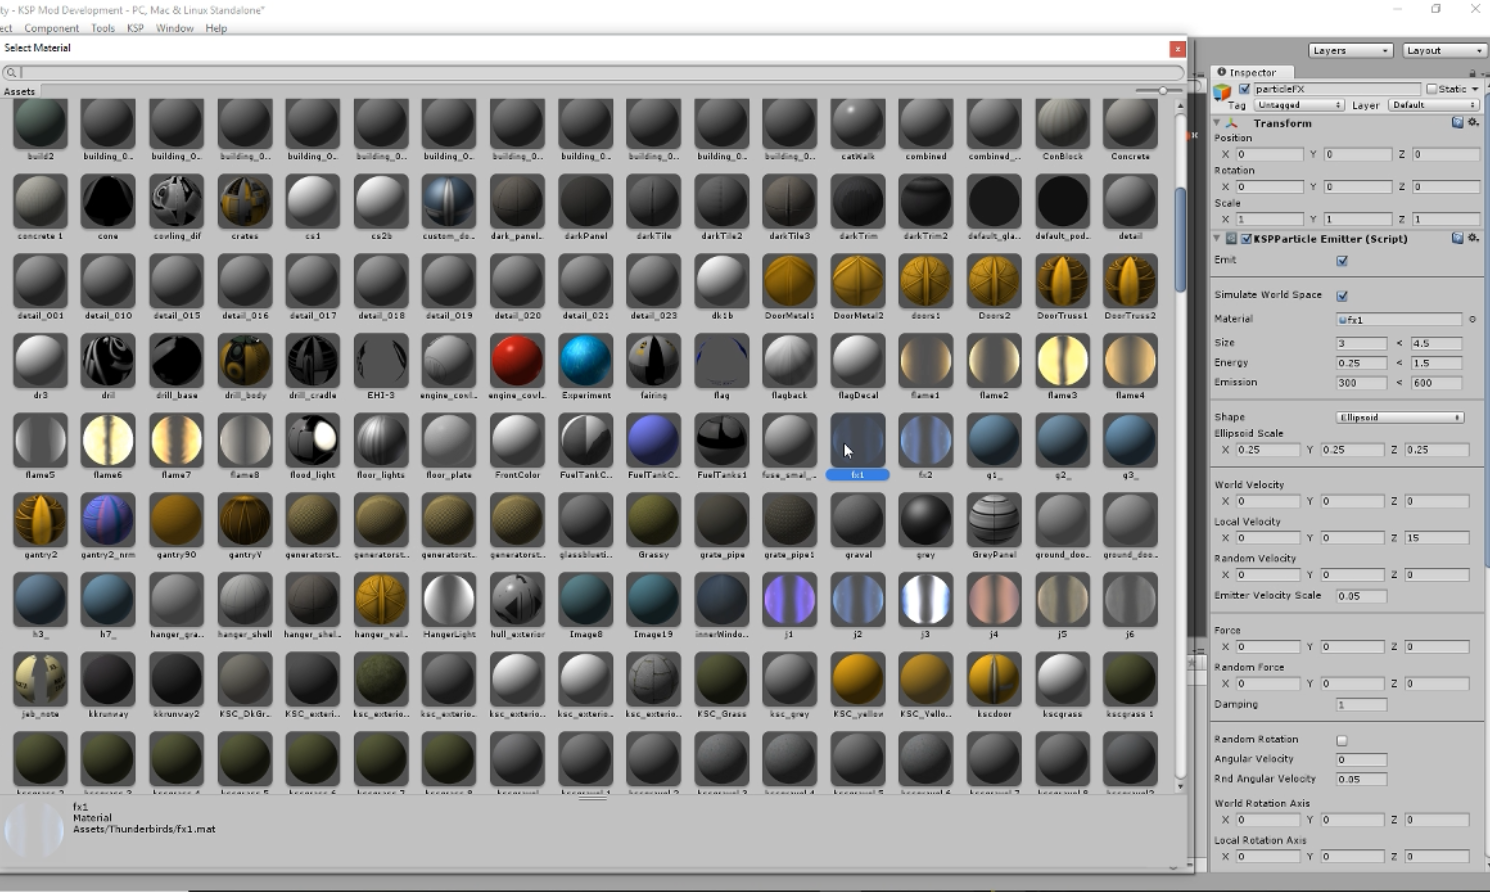
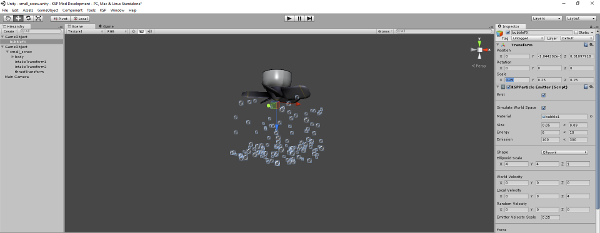
Select your 'particleFX' and transform look at the inspector.
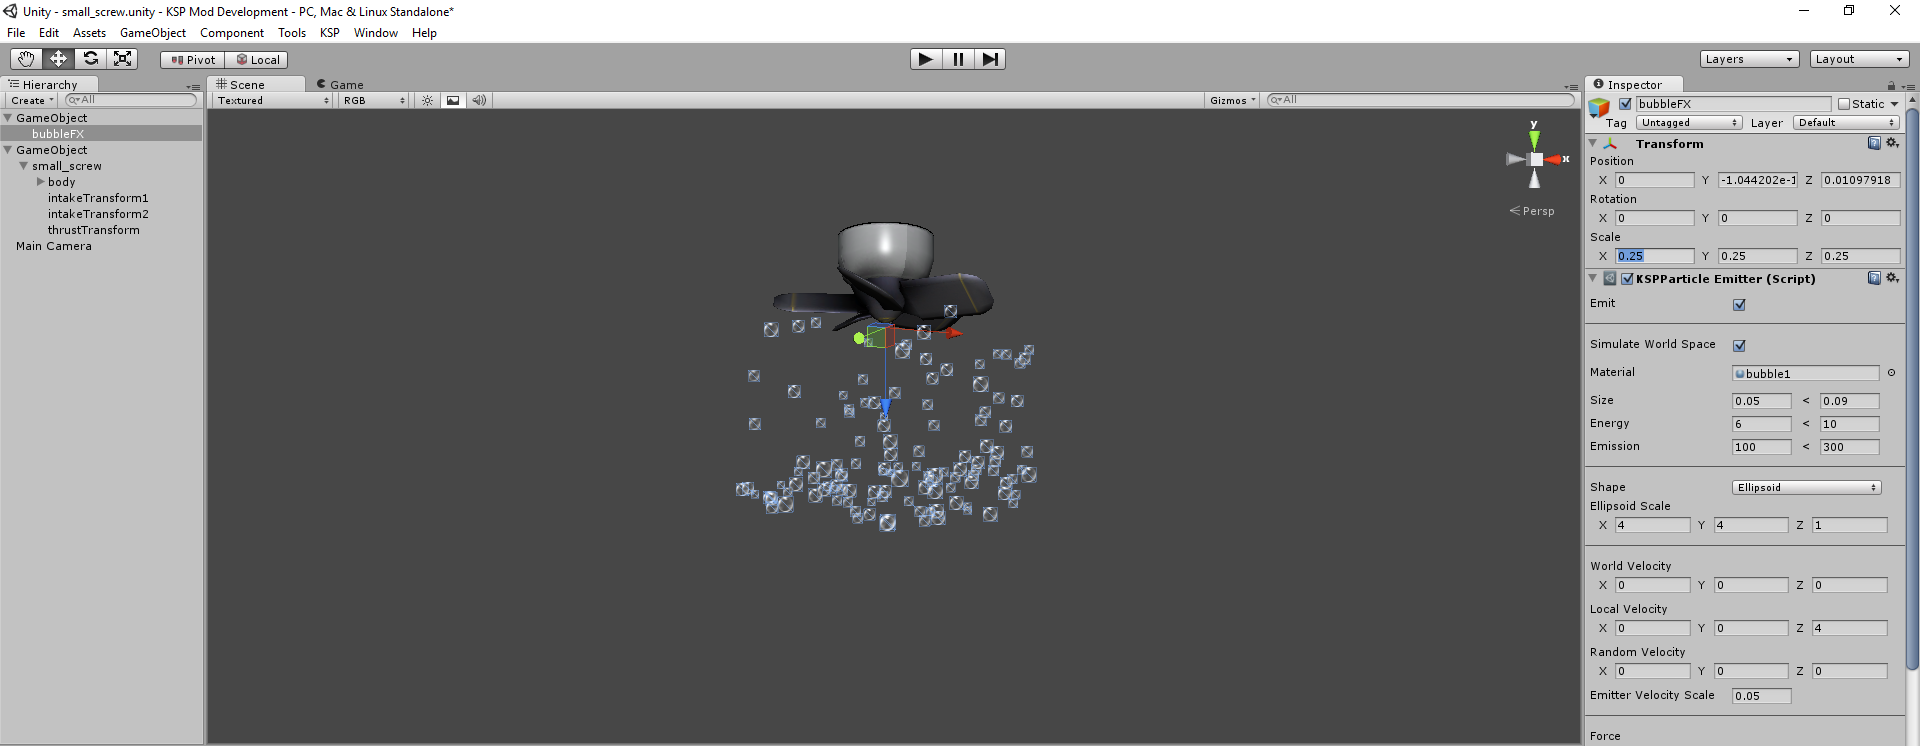
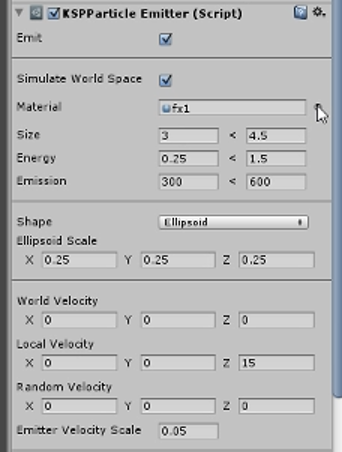
Below, these are the settings you'll be using to shape your particle effect. 'Scale' must be at 1,1,1 (x,y,z). 'Emit' and 'World Space' both boxes must be on (ticked).
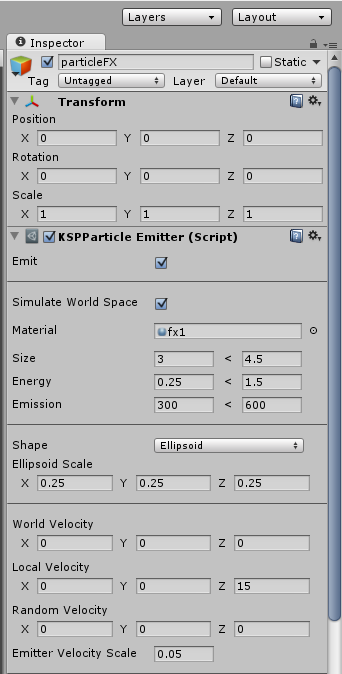
'Size': is the size of each particle emitted from smallest to largest. 'Energy': is the base energy (speed) each particle is emitted from lowest to highest. This is separate to the velocity. 'Emission': is the number of particles emitted from fewest to most.
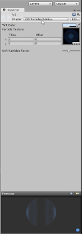
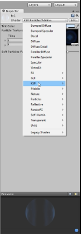
Material: is where you select the material you made in Step 5. You open the materials list by selecting the little circle to the left. This is shown in the images below.
'Shape': Should be ellipsoid for rocket and jet plumes. You can play around with different shapes to get different effects, but typically exhaust plumes are going to be ellipsoid. '(shape)Scale: Controls the size of the particle effect. As seen here for 'Ellipsoid Scale', this tells the emitter how big the particle effect should be. Small particles with a wide Ellipsoid will scatter around. This is great for bubbles which I will show you at the end.
'World Velocity', 'Local Velocity', and 'Random Valocity' is the vector of your particle effect. For the engine plume, you must use "Local Velocity Z" as this will direct the particle effect along the Z+ axis of your transform. The imputed number is how far the particle will travel in relationship to the energy the particle is emitted.
Feel free to use my settings if you aren't comfortable with how they work, but try different settings to see how each one interacts with the script.
Below are settings you generally won't be using, but if you feel comfortable or brave, play around with them to see what effects you make.
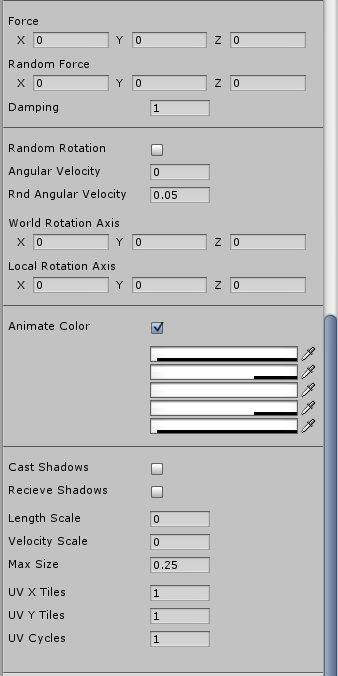
And finally, at the end of the particle script component is the texture that is selected for the particle. Here you can adjust the colour to change different hues for your particle effect.
You are now done with your engine FX set up. Compile the particle effect into an *.mu file, like you would a part and place it in your FX folder in your mod.
If you had used my settings, you should have something similar to the image below.
Step 7:
After you compile your particle effect using PartTools like you would for a part, you'll need to tell your engine config how to use the particle effect.
In the example image below I have the settings for the MASAMUNE engine from the Thermonuclear Turbines mod opened in Notepad++.
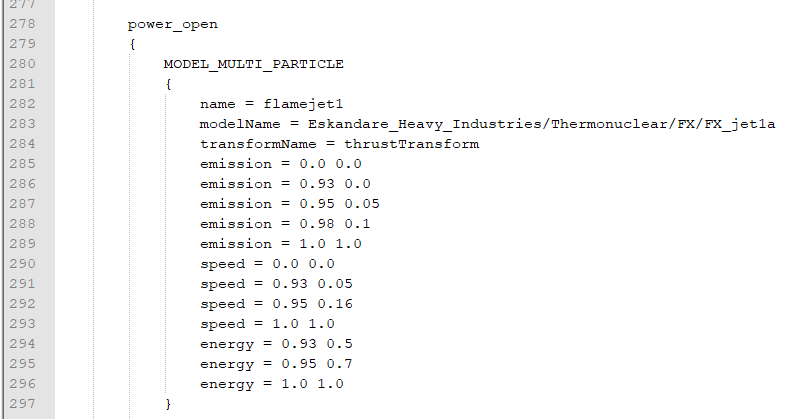
'Emission', 'Speed', and 'Energy' are part of a curve that tells the engine how to use the particle effect in a much similar to the set up in Unity. The engine module reads the particle effect *.mu file and applies the curve. The number are in percent of throttle and percent of the effect being emitted, where 0.5 is equal to 50% and 1.0 is equal to 100%. The numbers on the left is the percent of throttle position and the numbers on the right are the percent of the effect used. For example: if I wanted the effect to appear at half throttle at half the energy of the effect it would read 0.5 0.5. For a better example, the effect would read:
{
name = myrocket_plume_1(name you want to call the effect)
modelName = location/of_the/chosen_FX/folder/mu_file_name (the folder where the particle FX is located)
transformName = thrustTransform (name of the thrust transform)
emission = 0.0 0.0
emission = 0.5 0.5
emission = 1.0 1.0
speed = 0.0 0.0
speed = 0.5 0.5
speed = 1.0 1.0
energy = 0.5 0.5
energy = 1.0 1.0
}
An important note: KSP only supports one particle effect per *mu file. To make multiple blended effects you must compile each effect separately. (Example below)
EXTRA: Bubbles!
As I had said above, I would show how bubbles are done for propeller cavitation. It's fairly simple to do. You use a wide 'Ellipsoid', approximately the width of the propeller model, for the 'Ellipsoid Scale' and use a small particle. Use a bubble texture for the particle and set the material to KSP/Alpha/Unlit Transparent (because bubbles don't glow, unless you want them to).
Fin!:
Propeller parts and bubble FX in the above video are works by Alexander Treadwell CCNCA 4.0.
This concludes my tutorial on making engine FX for KSP in Unity 3d. I hope this sheds some light on the mystery and complexities of making custom engine FX. If you have any questions, or something isn't clear, feel free to contact me on Discord: Eskandare, KSP forum: Eskandare, or just email me.
Have fun and fly safe!
All other parts featured in the above video are Copyright © of Squad and Take Two Interactive, all rights reserved.